| FINGER PICKING EXERCISESBelow are some picking patterns designed for developing skills needed to progress to more complex picking patterns. These can be played while watching TV and without chords just to get accustomed to playing the strings without the use of a pick. If you want to you can add chords along with the patterns for a variation. If you are new to picking I'd suggest adding just one chord, maybe an Am every other measure which will give a sound variation. In the next section I will introduce some patterns used in songs. These exercises are the building blocks for those more complicated patterns. When you feel comforable with these, the rest will come easier. Besides the skill of playing the patterns, you should also develop the skill of changing from one pattern to another seamlessly, as very often these changes will be needed for a particular song.These patterns are all written in Tablature. Each line represents a string on the guitar. The notation p-i-m-a represent the fingers of the right hand. It comes from Latin designating: pollex (thumb), index (index), medius, (middle), and annularis (ring). These fingers should be placed on the strings with the index on the third string, middle on the second and ring on the first. The thumb will play the 6th, 5th, and 4th strings in an alternating rhythm with the fingers of the top strings. You can rest your fingers on the strings so that they will be in position to play. Fingernails are also useful for picking guitar strings. I keep the nails on my right hand a little longer than the nails on my left hand, which are kept very short. You should find a length that works for you. Mine are only about 1/8 inch beyond my fingers, but I do know some guitar players with nails an inch long on one hand. I can't play if they are too long. With that said, here are some patterns.  This first pattern focuses mainly on the base note which requires alternating between the bottom 3 strings with the thumb. First pluck the 6th string with your thumb. Then play the top three strings all at once by plucking on them with the other three fingers at the same time. The pattern shows using the thumb once, then the top 3 strings 3 times, then alternating the thumb for one more beat on another string inbetween each 3 beats of the other three fingers. You should practice until your comfortable alternating the thumb and keeping a consistent timing. Repeat the pattern over and over adding chords if you choose to, but chords can confuse you at first while your focusing on your right hand. 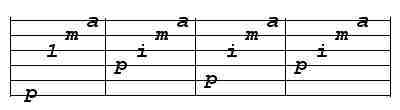 This pattern is similar to the first except that the top strings are played one at a time instead of all at once. Again practice until comfortable. Alternate between this pattern and the first one and increase speed as your skill develops.  This thrid exercise reverses the top three strings in fingering pattern. It is not as easy as it looks, to reverse direction, but it is an important skill to develop. Practice it until your comfortable with it and then try alternating with the other pattern in the opposite direction. Its awkward at first. Start slow and build up speed. 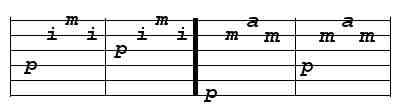 This pattern is actually two different fingering patterns. They appear the same but they actually change the fingering, with the index on the second string and the middle finger on the first string in the first two measures. It will help to develop the skill of knowing where the strings are. It will feel different from the normal fingering, but will allow you to develop the skill of changing patterns and fingering mid song without losing tempo. Practice the first two measures over and over. Then take a look at the last two measures. Same pattern but back to the normal fingers. It is very awkward to play with the middle and ring finger. One trick to mastering this pattern is to hold your index finger down on the 3rd string continuously througout. The 3rd string is never played in this exercise so it is not needed for a note. Keep your index finger down on it for balance and for a guide to keep yourself aware of which string is which. Play the other notes with the other fingers while holding on to the 3rd string with your index finger. Lift the index finger and see how much more difficult it becomes. Practice the last 2 measures over and over. Now to put this exercise to use, try playing the first two measures by adding a base thunb note on the third string which is plucked with the first string at the same time. This is a pattern that I use to play "Lady" by John Denver. However some of the chords in the song require shifting to the lower strings. But that pattern would be impossible to play with the normal fingering position, so it is good to be able to move up and down the strings. 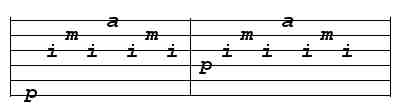 This exercise is a pretty one. The only difference between it and what has already been done is that the ring finger takes the place of that alternating thumb pattern. The thumb is still alternating but not for as many notes. Once you've mastered all these exercises, your ready to move on to patterns in songs. You will see these exercises in some combination in picking patterns. They are good to come back to and limber up your fingers. |